
Concur Request DCF Submission Instructions (Non-Labor AP Transaction)
Step 1: Budget Performance Report: Download your BPR (Budget Performance Report) to show your posted transaction. You will use this information to fill out the FROM section (examples: GL Report (GL324) for departmental transactions and PI Dashboard or GM (GM139) reports for Sponsored Projects transactions).
Step 2. Non-Labor Cost Transfer Justification Form: Complete the Non-Labor Cost Transfer Justification Form. Questions 1-4 are required to be answered for all cost transfers.
If question 5 ((a) More than 90 days after posting (b) After a final financial report/invoice has been completed (c) If there is a cost overrun on the sponsored project) is completed then the PI must sign the Non-Labor Cost Transfer Justification Form (this will then be processed in Concur over to GCAS where the GCAS SPFA and GCAS Controller Designee will review and approve).
Please answer all questions with a detailed response.
Step 3. Concur Requests:
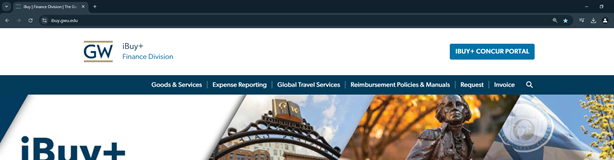
Log into the iBuy website and select IBUY+CONCUR PORTAL (the blue box).
Sign in to Concur.

Select Requests from the Home dropdown menu.

Select Create New Request.

Select DCF from the Type of Request dropdown menu.

Complete sections: Is this a Grant Request, A/P Detail (Vendor + Invoice) & JE Desc and any Comments. Then select Create Request (bottom right).

Your request has now been created and you can start to add the From and To portions. You can use multiple From and To sections as needed.
Remember that only one Invoice or Expense Report can be used per submission!
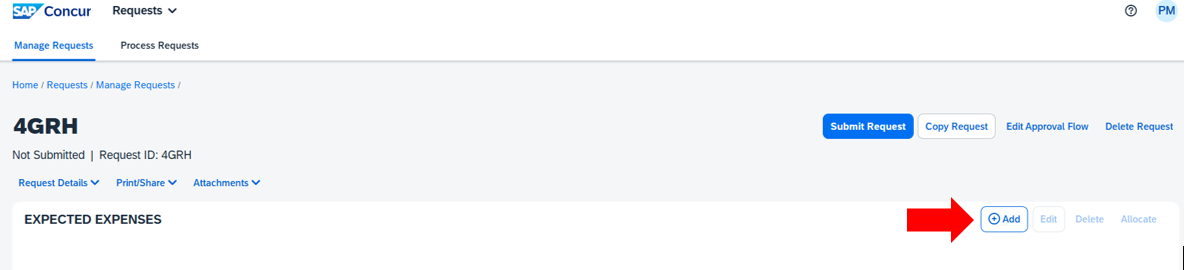
Select Add.
Select DCF FROM.

All of the information for the FROM section will be taken directly from your BPR (Budget Performance Report) backup documentation (GL324B, GM139, PI Dashboard, etc.). Please see below:
Account (GL: Account/GM: Resource Detail Number) BPR Date (GL: Effective Date/GM: PA Date)
Grant/Non-Grant (GL: Non-Grant/GM: Grant) Oracle Alias (GL: Org/GM: PTA)
Location (not currently used) Foreign Activity (if applicable, enter Region and Type of Activity)
Category/Source (GL&GM: Purchase Invoices) Amount (GL&GM: Amount)
JE Line Description: (GL&GM: Vendor Name, Invoice Number, Home Organization Number that is associated with the PTA) when a PTA is impacted, then select Save.

Select Add.
Select DCF TO.

In the TO section:
Account (GL: Account/GM: Resource Detail Number) BPR Date (GL&GM: same as FROM)
Grant/Non-Grant (GL: Non-Grant/GM: Grant) Oracle Alias (GL: Org/GM: PTA)
Location (not currently used) Foreign Activity (if applicable, enter Region and Type of Activity)
Category/Source (GL&GM: Purchase Invoices) Amount (GL&GM: Amount)
JE Line Description: (GL&GM: Vendor Name, Invoice Number, Home Organization Number that is associated with the PTA) when a PTA is impacted then select Save

Once the FROM and TO sections are complete your ticket will look like this:

Next you will add the attachments. You will be required to add the following:
1. Non-Labor Cost Transfer Justification form
2. BPR Backup documentation
3. Invoice or Expense Report and applicable receipts
You will select Attachments, Attach Documents and then in the pop up window you will Upload and Attach.


Finally, you will need to add your DCF approver.
Select Edit Approval Flow.

In the pop-up window under DCF Approver you can select your approver.
If you need to add additional Approvers, you will select Add Step either above or under the DCF Approver field based on the internal approval hierarchy and then select the approver’s name (you will notice that GCAS and AP are auto-filled in).
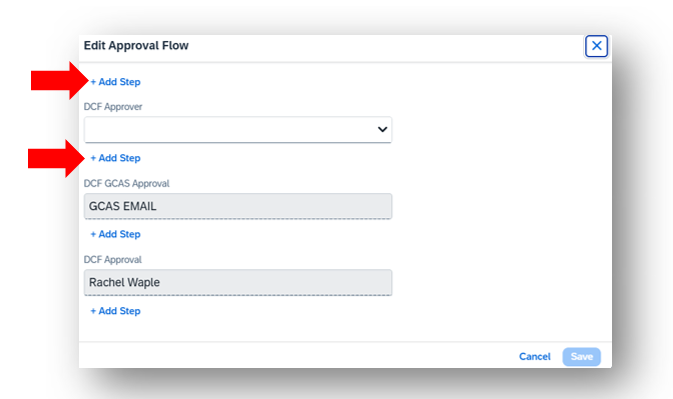
You can then select Save.
Double check the information you entered is correct and make sure your attachments are in place then select submit Request.

Approvals
There are two ways to review the approvals that come through to you for requests.
- On your iBuy home page you will see an Approval section under tasks
- You can access Approvals directly by going to Approvals in the dropdown menu.

Your approvals will be under requests. Select the approval, review, and approve.

Helpful Tips
- Only Non-Labor DCFs should be processed through Concur Requests (these are listed as Purchase Invoice on the BPR)
- Labor DCFs, Journal Entries, Interdepartmental Transfers, etc. are still processed through Remedy (Invoice Submission)
- Each DCF needs to have a copy of the BPR, Non-Labor Cost Transfer Justification Form and Original Invoice or Expense Reports with applicable receipts, these should be uploaded in PDF format
- If question 5 is answered on the CTJF, then the CTJF needs to be signed by the PI
- It is the responsibility of the individual that is creating the DCF to ensure all data elements in Concur and on the CTJF are entered correctly
- All CTJFs must be approved with a legible signature of the approver. To minimize the risk of an issue with the signature, Payables recommends using a digital signature.
- No one individual can act in both the role of the preparer and the approver for a CTJF submission.
- No one individual can approve a DCF to adjust activity for his/her own iBuy+ expense report.
- Only one Invoice/Expense Report can be processed per DCF.
- DCF adjustments will not be processed for transactions that cross the university's fiscal year.
- BPR Date: for GL it is listed as Effective Date on the BPR and for GM it is listed as the PA Date on the BPR.
- JE Line Description must include the Vendor Name, Invoice Number and Home Organization Number that is associated with the PTA) when a PTA is impacted.
To avoid a delay in processing a DCF or minimize the risk of a DCF being rejected, you are encouraged to read and become familiar with the Financial Transactions Adjustment Policy.
All requirements must be met before University Payables can process the request.